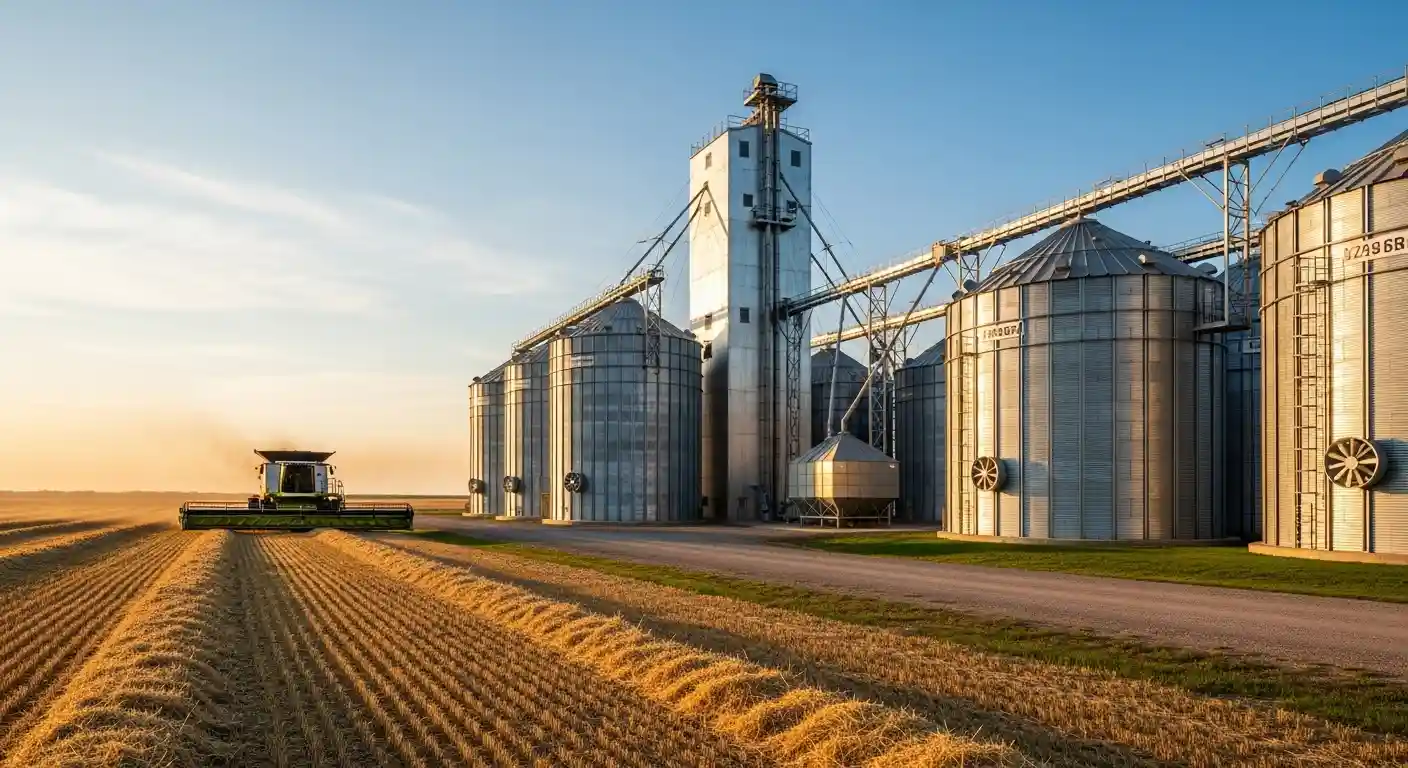
Grain storage management is what protects harvested grain after it leaves the field. Even clean, high-quality grain can lose value if moisture, airflow, temperature, insects, or mold are not controlled inside the bin. A strong storage plan starts before loading and continues through drying, aeration, monitoring, and safe unloading.
For farms and commercial grain operations, the goal is simple: keep grain dry, cool, clean, and stable until it is sold, processed, or moved. This guide explains the key steps that help prevent spoilage, reduce storage losses, and improve long-term grain quality.
Grain Storage Management Starts Before the Bin Is Filled
Grain storage management is not just about watching grain after harvest. It starts before the first load enters the bin. A clean, dry, well-ventilated bin gives grain a much better chance of staying in good condition through winter, spring, or longer storage periods.
Before filling a bin, remove old grain, fines, dust, and debris from the floor, walls, unload system, and area around the bin. Check the roof, doors, vents, seals, fans, floors, unload equipment, and sensors. Small issues like leaks, blocked vents, or damaged flooring can turn into major storage problems once the bin is full.
Clean Out Old Grain and Fines
Old grain, broken kernels, and fines can hold moisture and attract insects. Even a small amount of leftover grain can create problems when new grain is added.
The bin should be cleaned before harvest, along with augers, conveyors, pits, and grain handling equipment. Spilled grain around the bin should also be removed to reduce pest pressure.
Inspect Roofs, Floors, Vents, Doors, and Seals
Water leaks are one of the fastest ways to damage stored grain. Check roof sheets, vents, access doors, sidewalls, seams, and seals before loading.
Also inspect floors and unloading systems. If air cannot move through the floor properly, aeration will not work evenly across the grain mass. If bins have leaks, storm damage, weak floors, or worn components, this is the right time to schedule grain bin repairs or upgrades before harvest pressure starts.
Test Fans, Heaters, Sensors, and Unloading Equipment
Fans, heaters, cables, and unload systems should be tested before harvest. Waiting until the bin is full can lead to delays, uneven drying, or unsafe repairs.
This is also the right time to check whether the existing setup still fits the farm’s storage needs. Older fans, undersized systems, damaged vents, or outdated monitoring equipment can make grain harder to manage.

Grain Storage Management Checklist
Use this checklist before and during the storage season:
- Clean bins, floors, pits, augers, and conveyors before harvest.
- Remove old grain, fines, dust, and spilled grain around the bin.
- Repair leaks, damaged doors, blocked vents, and floor issues.
- Test fans, heaters, sensors, cables, and unload equipment.
- Dry grain to the right moisture level for the crop and storage period.
- Level the grain and core the bin after filling.
- Run fans based on temperature and humidity conditions.
- Keep roof vents and air paths clear.
- Check grain regularly for odor, crusting, insects, condensation, or heating.
- Use temperature cables or grain monitoring systems for larger storage setups.
- Never enter a bin while grain is flowing or equipment is running.
Store Grain at the Right Moisture Level
Moisture is one of the biggest factors in grain storage management. Grain that enters storage too wet can heat, mold, crust, spoil, or attract insects. Safe moisture levels depend on the crop, storage length, grain temperature, and how soon the grain will be marketed or used.
Short-term storage can sometimes allow slightly higher moisture. Long-term storage usually requires drier grain because it must stay stable through more temperature changes and a longer storage period.
Storage Period | Corn | Wheat | Soybeans |
September to October | 14% | 13.5% | 12% |
November to March | 15% | 14% | 13% |
April to May | 14% | 13% | 12% |
June to August | 13% | 12.5% | 11% |
These are general targets. Actual safe levels can vary based on weather, grain condition, storage time, and bin setup. The key is to dry grain before it becomes a storage risk, not after spoilage has already started.
For farms storing grain longer or dealing with higher harvest moisture, properly sized grain drying systems can help bring grain down to safer levels before long-term storage.
Short-Term vs. Long-Term Storage Moisture
Grain stored for a few weeks after harvest does not face the same risk as grain stored into spring or summer. Longer storage needs lower moisture because grain will go through more temperature changes and more time for insects or mold to develop.
If grain will stay in the bin for months, it should be dried and cooled carefully. Even small moisture problems can spread when airflow is poor or grain is not checked often enough.

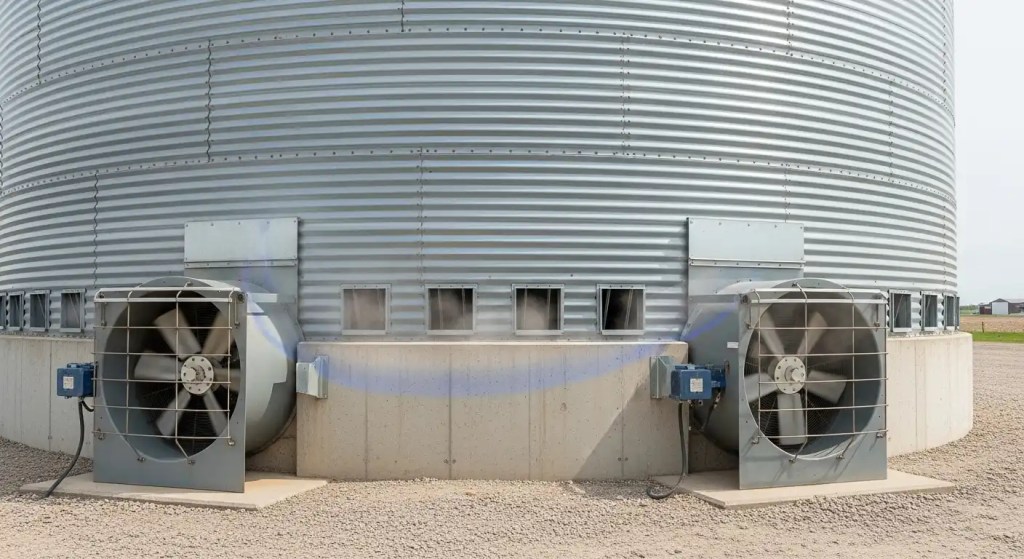
Manage Temperature and Aeration
Temperature control and aeration work together. Aeration helps cool dry grain, reduce moisture migration, and limit hot spots. It does not replace drying, and it should not be treated as a fix for grain that is already too wet.
Moisture migration happens when temperature differences inside the bin move moisture through the grain mass. Warm air can carry moisture upward and deposit it near cooler areas, such as the top grain layer, roof, or bin walls. This can lead to condensation, crusting, mold, and spoilage if the grain is not cooled evenly.
Air must move evenly through the grain mass. Fan size, grain depth, roof vents, floor condition, fines, and peaked grain all affect airflow. If one part of the bin gets less air, that area can heat or spoil while the rest of the grain looks fine.
Match Fan Capacity to Bin Size and Grain Depth
A fan has to be sized for the bin, crop, and grain depth. Deeper grain creates more resistance, so the same fan may not move enough air through a taller grain mass.
If fans are undersized, aeration may cool only part of the bin. That can leave hidden hot spots in the center or upper grain layers. Grain bin fans and aeration equipment should be matched to the full storage setup, not selected by bin size alone.
Keep Roof Vents and Air Paths Clear
Fans push air into the bin, but that air also needs a clear path out. Blocked or undersized roof vents can reduce airflow and create pressure problems inside the bin.
As a general planning rule, aerated bins need enough roof vent area to let fan air escape without causing condensation under the roof. Some extension guidance recommends about 1 square foot of roof vent area for every 1,000 CFM of fan capacity, but final venting needs should be matched to the bin and fan setup.
Roof vents, floors, and air channels should be checked before and during storage. Good airflow depends on the full system, not just the fan.
Avoid Running Fans Without Checking Conditions
Fans should not be run blindly. Warm, humid, or rainy conditions can add moisture instead of helping grain.
The goal is to cool and condition grain at the right times. Good monitoring helps decide when to run fans and when to leave them off.
Load and Level Grain Correctly
How grain enters the bin affects how well it stores. Grain that is peaked, overfilled, or loaded with too many fines can restrict airflow and create uneven storage conditions.
The goal is to keep grain clean, level, and easy to aerate. A well-filled bin is easier to monitor and less likely to develop hidden spoilage problems.
Avoid Overfilling the Bin
Overfilling can block roof vents, reduce airflow, and make grain harder to manage. It can also increase stress on the bin and make inspections more difficult.
Leave enough space for proper air movement and safe access. A bin that is packed too full may hold more bushels, but it can also increase storage risk.
Core the Bin After Filling
Coring the bin is one of the most important steps in grain storage management. Fines, broken kernels, and light material tend to collect in the center of the bin as grain is loaded.
After the bin is filled, remove grain from the center core. This pulls out fines and helps air move more evenly through the grain mass. It also lowers the risk of hot spots, insects, mold, and crusting near the center.
Reduce Kernel Damage During Handling
Cracked or damaged kernels spoil faster than whole grain. They also create more fines, which can block airflow.
Gentle handling, proper equipment setup, and clean grain flow can help protect grain quality before it ever reaches storage.
Monitor Stored Grain Throughout the Season
Grain storage does not stop after filling the bin. Stored grain should be checked regularly because problems often start slowly before they become visible.
During warmer months, grain should be checked more often. During colder months, checks may be less frequent, but they should still be part of a regular routine.
How Often to Check Stored Grain
In warm weather, stored grain may need to be checked weekly or every couple of weeks. In colder weather, monthly checks may be enough if grain is dry, cool, and stable.
Bins with known moisture issues, older equipment, poor airflow, or long-term storage plans should be monitored more closely.
Warning Signs of Spoilage
Common warning signs include musty odors, condensation, crusting, mold, insects, heating, caked grain, or grain that does not flow properly during unloading.
These signs should not be ignored. Once grain goes out of condition, it can become harder and more dangerous to manage.
Use Temperature Cables and Grain Monitoring Systems
Temperature cables and grain monitoring systems help detect problems before they are easy to see from the top of the bin. They can help track temperature changes, moisture concerns, and airflow performance.
For larger farms or commercial operations, grain management systems can reduce guesswork and make stored grain easier to manage throughout the season.
Follow Grain Bin Safety Practices
Poor grain condition can create safety problems. Spoiled, crusted, bridged, or caked grain may stop flowing, which often leads to dangerous bin entry.
Never enter a bin while grain is flowing. Shut down and lock out unloading equipment before any bin entry. Do not work alone, and use proper safety equipment when entry is required.
If grain is bridged, crusted, or out of condition, the safest choice is to get professional help. Preventing storage problems is always safer than trying to fix spoiled grain from inside the bin.
When to Upgrade Your Grain Storage System
Sometimes storage problems are not caused by one bad harvest. They are caused by an older or undersized system that no longer fits the operation.
It may be time to upgrade if the farm deals with recurring spoilage, slow drying, uneven airflow, roof leaks, damaged floors, old fans, limited bin space, poor unloading performance, or no reliable grain monitoring.
A better grain storage system can improve airflow, drying speed, monitoring, safety, and long-term grain quality. For many farms, upgrading one part of the system, such as fans, floors, vents, or monitoring, can make the entire setup easier to manage.
Get Help With Grain Storage Management
Agri-Systems helps farms and commercial grain operations plan, build, repair, and upgrade grain storage systems. That includes grain bins, drying systems, conditioning equipment, handling systems, aeration, fans, floors, vents, temperature cables, and monitoring solutions.
If your current setup struggles with airflow, storage capacity, drying speed, moisture control, or grain monitoring, Agri-Systems can help review the full system and recommend practical improvements.
Frequently Asked Questions
The most important parts are moisture control, temperature management, airflow, and regular monitoring. Grain should enter the bin at the right moisture level, then be cooled, aerated, and checked throughout storage.
Storage time depends on moisture, temperature, and grain type. Dry, cool grain lasts longer.
Aeration helps control grain temperature, reduce moisture migration, and prevent hot spots. It works best when the fan, floor, vents, and grain depth are properly matched.
Stored grain should be checked more often during warm weather, often weekly or every couple of weeks. During colder months, monthly checks may be enough if the grain is dry, cool, and stable.
Corn can often be stored around 15% moisture for short-term storage during colder months. For longer storage or warmer months, it is usually safer closer to 13% to 14%, depending on storage length and conditions.


